[chef][rvm] chef-rvmを利用した設定のサンプル
chef-soloを利用して、rubyのrvmをインストールするときのサンプルです。
インストール後の環境の変化は
- インストール先は、/usr/local/rvm
- /etc/bash.bashrcにrvmの設定が追加される。
バージョン情報
- chefのworkstationのrubyは2.0.0p247
- chef (11.8.2)
- knife-solo (0.4.1)
- librarian-chef (0.0.2)
Cheffile
site 'http://community.opscode.com/api/v1'

cookbook 'rvm', :git => 'https://github.com/fnichol/chef-rvm'
librarian-chefを実行
$ librarian-chef install
chef_gem (0.1.0)
rvm (0.9.1)
nodes/foo-node.json
{
  "rvm" : {
    "user": "root",
    "default_ruby" : "ruby-2.0.0-p195",
    "rubies":  [ "ruby-2.0.0-p195" ]
  },

  "run_list": [
     "recipe[rvm::system]"
  ]
}
$ knife solo cook foo-node
[HTML5][Storage] オフライン閲覧
HTML5のStorageとJQuery Mobileを用いてオフライン閲覧のサンプルを作りました。
- jquery mobileはコンテンツがページ単位ですので、ページをHTML5のStorageで保存しています。
- anchor要素をクリックした時、Storageにページがあれば、$.mobile.changePageを実行します。もし、Storageにページがなければネットワークからコンテンツを取得します。
<!DOCTYPE html>
<html>

<head>
  <meta http-equiv="content-language" content="ja">
  <meta charset="UTF-8">
  <title>コンテンツをHTML5ストレージでキャッシュする</title>
  <link rel="stylesheet" href="http://code.jquery.com/mobile/1.3.1/jquery.mobile-1.3.1.min.css" />
  <script src="http://code.jquery.com/jquery-1.9.1.min.js"></script>
  <script src="http://code.jquery.com/mobile/1.3.1/jquery.mobile-1.3.1.min.js"></script>

<script type="text/javascript">
var storage = sessionStorage;   <!-- セッションストレージ -->

var url= 'test.html';
function preload() {
  console.log('preload contents');
  $.get(url, function(data) {
    console.log('test.html get.');
    var content;
    var $doc = $(data);
    content = $doc.filter('#top');
    var preload = '<div id="preload" data-role="page">'
      + content.html() + '</div>';
    storage.setItem(url, preload);
    //console.log('#preaload:' + preload);
  });
}
$(document).ready(function() {
  preload();

  $("a").on('click', function() {
    var href = $(this).attr('href');
    console.log('click1. href:' + href);
    var page;
    if ((page = storage.getItem(href))) {
      // storageにコンテンツがあれはそれを使う。
      console.log(href + ' load from storage');
      $('#preload').replaceWith(page);
      $.mobile.changePage('#preload');
      return false;
    } else {
      console.log(href + ' load from network');
      $.mobile.changePage(href);
    }
  });
});
</script>
</head>

<body>

<div data-role="page">
  <div data-role="header">
    <h2>オフライン閲覧例</h2>
  </div>
  <div data-role="content">
    <p>jQuery MobileのコンテンツをHTML5のStorageで保存してオフライン閲覧できる>ようにしたサンプル。</p>
    <ul>
      <li>anchorタグのhref属性のURLを事前にajaxでロード</li>
      <li>ロードしたページをHTML5のセッションストレージで保存する。</li>
      <li>セッションが有効な間は、test.htmlリンクをクリックすると、セッションス
トレージからコンテンツをロードする。</li>
    </ul>
    <p><a href="test.html">test.html は、HTMLT5のストレージからロード</a></p>
    <p><a href="test2.html">test2.htmlは、ネットワーク経由でロード</a></p>
  </div>
  <div data-role="footer">
    <h4>Copyright 2013</h4>
  </div>
</div>

<!-- id=preloadのコンテンツをreplaceWithで置き換える。-->
<div id="preload" data-role="page">
</div>

</body>
</html>
test1.htmlファイル
<!DOCTYPE html>
<html>

<head>
<meta http-equiv="content-language" content="ja">
<meta charset="UTF-8">
<title>test</title>
</head>

<body>

<div id="top" data-role="page">
  <div data-role="header">
    <h2>test.html</h2>
  </div>
  <div data-role="content">
    <p>こんばんは。</p>
  </div>
  <div data-role="footer">
    <h4>Copyright 2013</h4>
  </div>
</div>

</body>
</html>
Titanium StudioのKitchen Sinkが動作しない場合の対処例
Titanium Studioを使ってサンプルアプリのKitchen SinkがAndroid Emulatorで動作しなかった場合、下記のようにすれば動作するかも?しれません。
[手順]
- Android SDKのインストールディレクトリに移動
- ./tools/androidを起動
- メニューの[Tools], [Manager AVDs]を選択
- [Android Virtual Device Manager]ウィンドウのTitanium Studioが自動生成したAVDを選択します。私の場合、[titanium_2_HVG]でした。
- [Edit]ボタンを押下
- [Target]を[Google APIs (Google Inc.) - API Level8]に変更
- [Sink]をWVGA800に変更。
- Kitchen Sinkを再度Android emulatorから起動させます。
[試した環境]
Titanium MobileでDigest認証を使ってHTTP接続する
Titanium MobileでHTTPのDigest認証するためのコードのサンプルです。
簡単にコピペできるようにあえて、モジュール化もしていません。
ソース自身は、githubのhttpclient-digest.nodeを参照して、一部改変しました。
function sampleDigestAuth() {
	var xhr = Ti.Network.createHTTPClient();
	xhr.onload = function() {
		Ti.API.info("status:" + this.status);
		if (this.status == 200) {
			Ti.API.info("responseText:" + this.responseText);
			Ti.API.info("Content-Type:" + this.getResponseHeader("Content-Type"));
		}
	}
	xhr.onerror = function() {
		Ti.API.info("status:" + this.status);
		if (this.status == 401) {
			var wwwAuth = xhr.getResponseHeader('WWW-Authenticate');
			Ti.API.info("auth:" + wwwAuth);
			var authInfo = parseWWWAuth(wwwAuth);

			var user = "foo";
			var password = "password";
			var authorization = createAuthHeader("GET", authInfo.realm,
	             authInfo.nonce, authInfo.opaque, authInfo.qop,
	             user, password, "/");
	      	//Ti.API.info("h:" + h);
			xhr.open('GET', 'http://localhost:8124/');
	      	xhr.setRequestHeader("Authorization", authorization);
	      	xhr.send();
		}
	}

	xhr.open('GET', 'http://192.168.11.103:8124/');
	xhr.send();
}

function parseWWWAuth(wwwAuth) {
  var ret = {};

  ret['realm'] = wwwAuth.match(/realm="([^"]+)"/)[1];
  ret['qop'] =  wwwAuth.match(/qop="([^"]+)"/)[1];
  ret['nonce'] = wwwAuth.match(/nonce="([^"]+)"/)[1];
  var opaqueMatch = wwwAuth.match(/opaque="([^"]+)"/);
  if (opaqueMatch) ret['opaque'] = opaqueMatch[0];
  return ret;
}

function createAuthHeader(method, realm, nonce, opaque, qop,
                          username, password, uri) {
  var a1 = buildA1(realm, username, password)
  var ha1 = Titanium.Utils.md5HexDigest(a1)
  var a2 = buildA2(method, uri)
  var ha2 = Titanium.Utils.md5HexDigest(a2)

  var nc = formatNonceCount(1)
  var cnonce = buildCnonce();

  var response = buildResponse(ha1, ha2, nonce, nc, cnonce, qop)
  var hresp = Titanium.Utils.md5HexDigest(response)
  var ret = buildAuthHeader(username, realm, nonce, uri, cnonce, nc, qop, hresp, opaque);

  return ret;
}

// create client cnonce
function buildCnonce() {
  return random(12, "0123456789abcdef");
}

function random(len, source) {
  var result = '';
  var sourceLen = source.length;
  for (var i = 0; i < len; i++) {
    result += source.charAt(Math.floor(Math.random() * sourceLen));
  }
  return result;
}

function buildResponse(ha1, ha2, nonce, nc, cnonce, qop) {
  return ha1 + ":" + nonce + ":" + nc + ":" + qop + ":" + ha2
}

function buildAuthHeader(username, realm, nonce, uri, cnonce, nc, qop,
                         hresp, opaque) {
  var ret =
  	'Digest username="' + username +
    '", realm="' + realm +
    '", nonce="' + nonce +
    '", uri="' + uri +
    '", nc=' + nc +
    ', qop="' + qop +
    '", response="' + hresp +
    '", cnonce="' + cnonce + '"'
    '", algorithm="' + "MD5" + '"';
  return ret;
}

function formatNonceCount(count) {
  var nc = count.toString(16);
  while(nc.length < 8) {
  	nc = "0" + nc;
  }
  return nc
}

function buildA1(realm, user, passwd) {
  return user + ":" + realm + ":" + passwd
}

function buildA2(method, uri) {
  return method + ":" + uri
}
参照
Could not find a storyboard named 'MainStoryBoard' in bundle NSBundleエラーが表示される時
何らかの原因で、Could not find a storyboard named 'MainStoryBoard' in bundle NSBundle がコンソールに表示されてiOSアプリが動作しない時の対処方法を書いておきます。
XCode 4.3系で動作確認しました。
- Show project Navigatorを開く。
- MainStoryboard.storyboardを選択し、Deleteを選択し、Remove referenceを実行
- project NavigatorでAdd files to [プロジェクト名] を選択
- MainStoryboard.storyboardを選択する。
ステートパターンの実装例
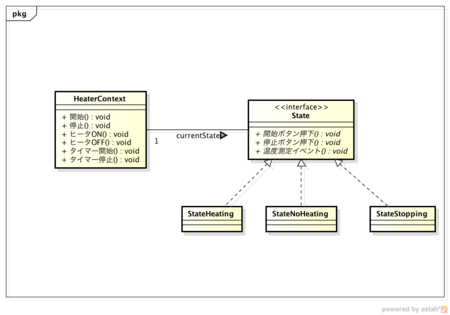
ステートパターンでどのように実装すればいいのかを考えてみます。
題材は、熱帯魚の水槽のヒータを制御することにしました。この題材を選んだ理由は、enterアクションやexitアクションがある、定期的に温度を計測する必要があるからです。
今回のポイントは、
- 状態遷移図からステートパターンで実装したときの長所や短所をみきわめる。
- 定期的に発生する温度計測をどのように実装に反映すべきかを考える。
結論は、StateインタフェースにmeasureEventメソッドを定義し、一定時間ごとのタイマーでこれを呼び出す。 - enterアクションは、どのように表現する?
結論は、加熱中状態クラスのコンストラクト時にContextを引数にする。プライベートメソッドでenterActionメソッドを定義 - exitアクションは明示的にプライベートメソッドを定義。
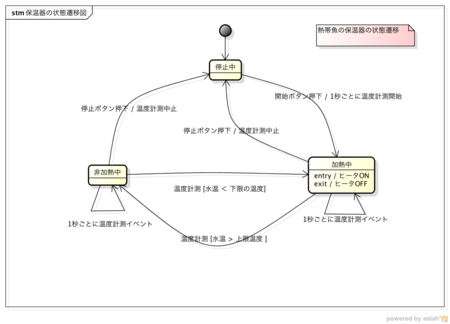
まずは、状態遷移図です。

イベントは、下記の3つとしました。温度計測をイベントにしないとねぇ。
- 開始ボタンを押す
- 停止ボタンを押す
- 温度計測イベント
状態遷移のガード条件は、
- 加熱中状態から非加熱状態へ遷移するには、ガード条件として「水温が設定した上限を上回る」
- 非加熱状態から加熱状態へ遷移するには、ガード条件として「水温が設定した下限以下になる」
次にソースコードです。
public interface State {
  /** 開始ボタン押下   */
  public State pushStart(HeaterContext heater);
  /** 終了ボタン押下 */
  public State pushStop(HeaterContext heater);
  /** 温度測定イベント発生 */
  public State measureEvent(HeaterContext heater);
}
加熱中状態のソースです。
public class StateHeating implements State {
  // entryアクションがある場合、コンストラクタでContextが引数に必要。
  public StateHeating(HeaterContext heater) {
    entryAction(heater);
  }

  public State pushStart(HeaterContext heater) {
    return this;   // 不正なイベントなので、状態は変化しない。
  }

  public State pushStop(HeaterContext heater) {
    exitAction(heater);
    return new StateStopping();
  }

  public State measureEvent(HeaterContext heater) {
    // ガード条件. [水温 > 上限の設定温度]
    if (heater.isExceedMaxTemp()) {
      exitAction(heater);
      return new StateNoHeating();
    }
    return this;
  }

  // entryアクションは明示的にメソッドを定義する設計
  private void entryAction(HeaterContext heater) {
    heater.heaterOn();
  }

  // exitアクションは明示的にメソッドを定義する設計
  private void exitAction(HeaterContext heater) {
    heater.heaterOff();
  }

  public String toString() {
    return "StateHeating";
  }
}
HeaterContextのソースです。
public class HeaterContext {
  private int maxTemp;
  private int minTemp;
  private int currentTemp;
  private int direction = 3;

  private State currentState = new StateStopping();
  // 温度計測イベントが非同期で発生するのでロックが必要
  private Object stateLocker = new Object();
  private Timer timer;
  private TimerTask timerTask;

  public void start() {
    synchronized (stateLocker) {
      currentState = currentState.pushStart(this);
    }
    startTimer();
  }
  public void stop() {
    stopTimer();
    synchronized(stateLocker) {
      currentState = currentState.pushStop(this);
    }
  }

  public void heaterOn() {
    System.out.println("Heater ON");
    direction = +3;
  }
  public void heaterOff() {
    System.out.println("Heater OFF");
    direction = -3;
  }

  // 一定時間ごとに温度を計測するタイマーを開始
  private void startTimer() {
    if (timer == null) timer = new Timer();
    if (timerTask == null) timerTask = new OneSecTimer(this);
    timer.schedule(timerTask, 1000, 1000);
  }
  private void stopTimer() {
    if (timer != null)   timer.cancel();
  }

  class OneSecTimer extends TimerTask {
    private HeaterContext heaterContext;
    public OneSecTimer(HeaterContext heaterContext) {
      this.heaterContext = heaterContext;
    }

    public void run() {
      currentTemp += direction;  // 温度を変化させるダミーコード
      System.out.println("current temp:" + currentTemp + ", state:" + currentState);
      synchronized(stateLocker) {
        currentState = currentState.measureEvent(heaterContext);
      }
    }
  }

  public boolean isExceedMaxTemp() {  // 上限温度を超えたか?
    if (currentTemp > maxTemp) return true;
    return false;
  }
  public boolean isExceedMinTemp() {  // 下限温度を下回ったか?
    if (currentTemp < minTemp) return true;
    return false;
  }

  public HeaterContext() {
    currentTemp = 25;
    minTemp = 30;
    maxTemp = 36;
  }

  public State getState() {
    return currentState;
  }
}
以上、いかがでしょうか?
状態遷移図を記述して、ステートパターンで実装すると設計、製造が分かりやすくなるように感じました。
