ステートパターンの実装例
ステートパターンでどのように実装すればいいのかを考えてみます。
題材は、熱帯魚の水槽のヒータを制御することにしました。この題材を選んだ理由は、enterアクションやexitアクションがある、定期的に温度を計測する必要があるからです。
今回のポイントは、
- 状態遷移図からステートパターンで実装したときの長所や短所をみきわめる。
- 定期的に発生する温度計測をどのように実装に反映すべきかを考える。
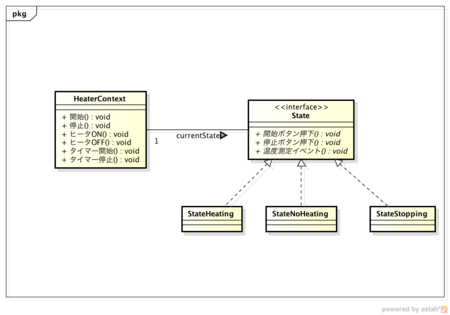
結論は、StateインタフェースにmeasureEventメソッドを定義し、一定時間ごとのタイマーでこれを呼び出す。 - enterアクションは、どのように表現する?
結論は、加熱中状態クラスのコンストラクト時にContextを引数にする。プライベートメソッドでenterActionメソッドを定義 - exitアクションは明示的にプライベートメソッドを定義。
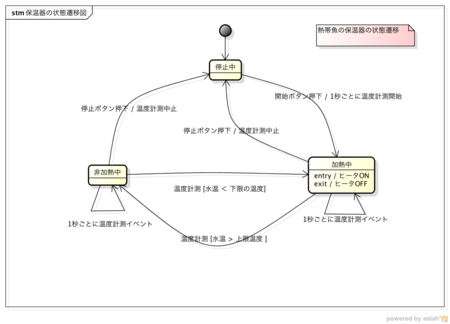
まずは、状態遷移図です。

イベントは、下記の3つとしました。温度計測をイベントにしないとねぇ。
- 開始ボタンを押す
- 停止ボタンを押す
- 温度計測イベント
状態遷移のガード条件は、
- 加熱中状態から非加熱状態へ遷移するには、ガード条件として「水温が設定した上限を上回る」
- 非加熱状態から加熱状態へ遷移するには、ガード条件として「水温が設定した下限以下になる」
次にソースコードです。
public interface State {
  /** 開始ボタン押下   */
  public State pushStart(HeaterContext heater);
  /** 終了ボタン押下 */
  public State pushStop(HeaterContext heater);
  /** 温度測定イベント発生 */
  public State measureEvent(HeaterContext heater);
}
加熱中状態のソースです。
public class StateHeating implements State {
  // entryアクションがある場合、コンストラクタでContextが引数に必要。
  public StateHeating(HeaterContext heater) {
    entryAction(heater);
  }

  public State pushStart(HeaterContext heater) {
    return this;   // 不正なイベントなので、状態は変化しない。
  }

  public State pushStop(HeaterContext heater) {
    exitAction(heater);
    return new StateStopping();
  }

  public State measureEvent(HeaterContext heater) {
    // ガード条件. [水温 > 上限の設定温度]
    if (heater.isExceedMaxTemp()) {
      exitAction(heater);
      return new StateNoHeating();
    }
    return this;
  }

  // entryアクションは明示的にメソッドを定義する設計
  private void entryAction(HeaterContext heater) {
    heater.heaterOn();
  }

  // exitアクションは明示的にメソッドを定義する設計
  private void exitAction(HeaterContext heater) {
    heater.heaterOff();
  }

  public String toString() {
    return "StateHeating";
  }
}
HeaterContextのソースです。
public class HeaterContext {
  private int maxTemp;
  private int minTemp;
  private int currentTemp;
  private int direction = 3;

  private State currentState = new StateStopping();
  // 温度計測イベントが非同期で発生するのでロックが必要
  private Object stateLocker = new Object();
  private Timer timer;
  private TimerTask timerTask;

  public void start() {
    synchronized (stateLocker) {
      currentState = currentState.pushStart(this);
    }
    startTimer();
  }
  public void stop() {
    stopTimer();
    synchronized(stateLocker) {
      currentState = currentState.pushStop(this);
    }
  }

  public void heaterOn() {
    System.out.println("Heater ON");
    direction = +3;
  }
  public void heaterOff() {
    System.out.println("Heater OFF");
    direction = -3;
  }

  // 一定時間ごとに温度を計測するタイマーを開始
  private void startTimer() {
    if (timer == null) timer = new Timer();
    if (timerTask == null) timerTask = new OneSecTimer(this);
    timer.schedule(timerTask, 1000, 1000);
  }
  private void stopTimer() {
    if (timer != null)   timer.cancel();
  }

  class OneSecTimer extends TimerTask {
    private HeaterContext heaterContext;
    public OneSecTimer(HeaterContext heaterContext) {
      this.heaterContext = heaterContext;
    }

    public void run() {
      currentTemp += direction;  // 温度を変化させるダミーコード
      System.out.println("current temp:" + currentTemp + ", state:" + currentState);
      synchronized(stateLocker) {
        currentState = currentState.measureEvent(heaterContext);
      }
    }
  }

  public boolean isExceedMaxTemp() {  // 上限温度を超えたか?
    if (currentTemp > maxTemp) return true;
    return false;
  }
  public boolean isExceedMinTemp() {  // 下限温度を下回ったか?
    if (currentTemp < minTemp) return true;
    return false;
  }

  public HeaterContext() {
    currentTemp = 25;
    minTemp = 30;
    maxTemp = 36;
  }

  public State getState() {
    return currentState;
  }
}
以上、いかがでしょうか?
状態遷移図を記述して、ステートパターンで実装すると設計、製造が分かりやすくなるように感じました。
